Frequently Asked Questions
Bulk upload Products onto your website
You can bulk upload new products and edit existing products onto your website using our CSV bulk Upload feature. You need to navigate to WordPress > Products > Toolbox
Please note that you If you want to compare prices from multiple stores/vendors for the same product, then you will have to create multiple rows for the same product. For example if Product XYZ has offers from both Amazon and Ebay then, this product will have 2 rows for the prices from Amazon and Ebay in the CSV file one below the other.
Uploading new products
- Click on "download sample file". This will download a sample file on your computer with all the required fields that you need to fill up
- Below are the fields that you will need to fill
- ID: You need to keep this blank if you want to upload a new product. This will only be used when you want to update an existing product as mentioned in the 2nd section of this document below.
- Title: Title is a mandatory field. You can add a title/name for your product in this field. As mentioned above you will need to create multiple rows for the same product in order to update multiple offers from multiple vendors/stores. You will have to make sure that the title is exactly same in all the rows for that particular product. If the title is different then instead of adding a new offer for the same product, a new product will be created altogether.
- Description: You can use text to give details about the products, like specifications, variant, warranty, etc. (You can only add text using the CSV upload. If you wish to add images, video etc. to the description, you will have to go to wordpress > products and edit the product you need)
- Excerpt: Here, you can add a short summary for the product on the product page. (if you leave this blank, the text from product description will be shown as product summary)
- Categories: You can map an existing category to your product from here or even create a new category and map it to your product. You need to enter the exact name of the category here as on your website. If the category is not an exact match, then a new category will be created. (category field is case sensitive)
- Currency: You can insert any product currency using this field. (If you leave this blank, the default currency that you have chosen while setting up your comparison plugin, will be fetched)
- Currency Position: Here you can enter either "prefix" to show currency before the amount or "suffix" to show currency after the amount. (If you leave this blank, then the default currency position will be used that you have chosen while setting up your comparison plugin)
- Original Price: Here, you need to enter the original price of the product without any offer or discount. Make sure that this price is higher than any other offer prices you quote
- Image URL: Here you can add the image URL for the product that you are creating.
- Start Date: Your product will be visible on your website from this date (make sure you follow the date format as 12-03-2021)
- End Date: Your product will be visible on your website till this date (if you leave this blank, the product will be permanently visible on your website. make sure you follow the date format as 12-03-2021))
- Verified On: Here, you can enter the date when the offer price was last verified (make sure you follow the date format as 12-03-2021)
- Priority: You can set a display priority from here. Make sure you enter a whole number.(Greater the display priority, higher the product will be listed on your website on pages such as store page, category page etc)
- Page Title: Here, you can choose to have a custom title for your product page (If you leave this blank, your default product title will be displayed as page title on the product page)
- Store: This is a mandatory field. You can either map the product to an existing store here or create a new store all together. Remember that you need to enter the store slug here exactly as it is on your website if you want to use an existing store. If you add a new slug here, a new store will be created on your website and the product will be mapped to that store.
- Offer Price: This is mandatory field. Here you need to enter the offer price for the product on a particular store. If you leave this blank then that store will not be mapped to the product (you will have to create multiple rows to update offer prices from multiple stores for the same product)
- Offer URL: This is a mandatory field. Offer URL is the your affiliate URL via which the customer will be redirected to the product page on store website. If you leave this blank then that store will not be mapped to the product
- Product URL: You only need to update this field if you are using the browser extension. This is mandatory for the browser extension to work correctly and show product offers. Make sure that when you paste the product URL here, you paste the URL for the landing page of the product on the merchant store. Also, make sure you only paste the URL before the question mark.
For example, if the URL is -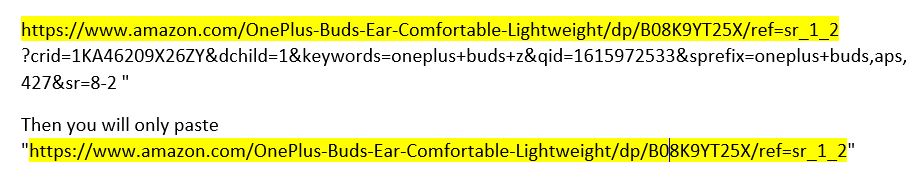
- Once you have made the changes, save the file and go to WordPress > Products > Toolbox, click on choose file and select the file that you just saved. Then Click on import file
- Your new products should now be created
Editing existing products
- Go to WordPress > Products > toolbox and then click on download all products
- This will download a CSV file to your computer comprising all the products that are listed on your website
- You will notice that there are multiple rows for a single product comprising of offers from different stores however the ID will be the same across all rows for that particular product. Make sure you do not change this ID. If you change the ID, a new product will be created or if the ID is corresponding to any other product, then that product will be updated.
- Make the changes which you want to update in the file that you had downloaded and save the file
- Now, go to WordPress > Products > Toolbox, click on choose file and select the file that you just saved. Then Click on import file
- Your Products should now be updated
Last Updated 2 years ago